| Platform | ✅ Web ✅ Mobile |
|---|---|
| Plan | ✅ Standard ✅ Professional ✅ Premium |
| User Type | ✅ Administrator ✅ Technician ✅ Limited Technician ❌ Requester ❌ Extended Requester |
In order for the notification to be processed, it must first be accepted by the work coordinator. The notification acceptance process is available to the following users: technician and system administrator.
When accepting a notification, the works coordinator will be able to assign it to the appropriate persons,plan the work to be performed in the WORKS tab and determine the points to be checked in the CHECKLIST tab .
In small organizations, the application acceptance process can be skipped by properly setting up the application flow.
Step-by-step Work Order completion in the mobile app #
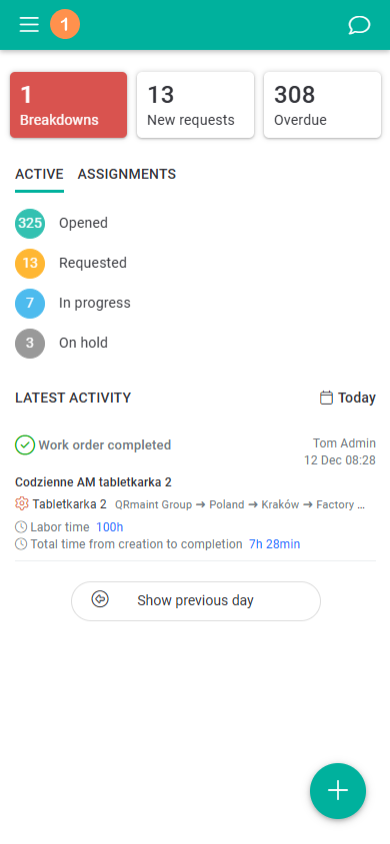
- Launch the QRmaint application on your mobile device.
- Log in to your QRmaint user account.
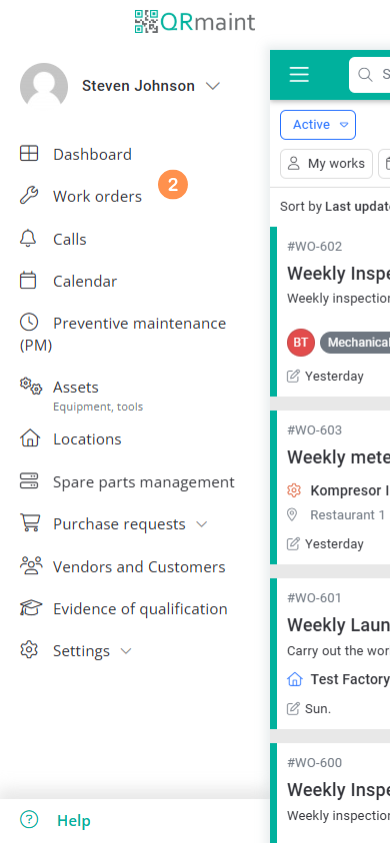
- Expand the main menu by clicking on the three horizontal lines

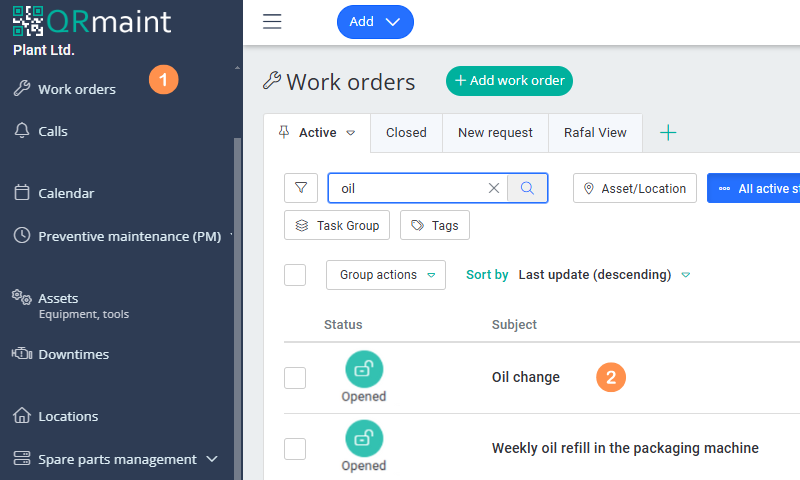
- In the main menu, select Work Orders

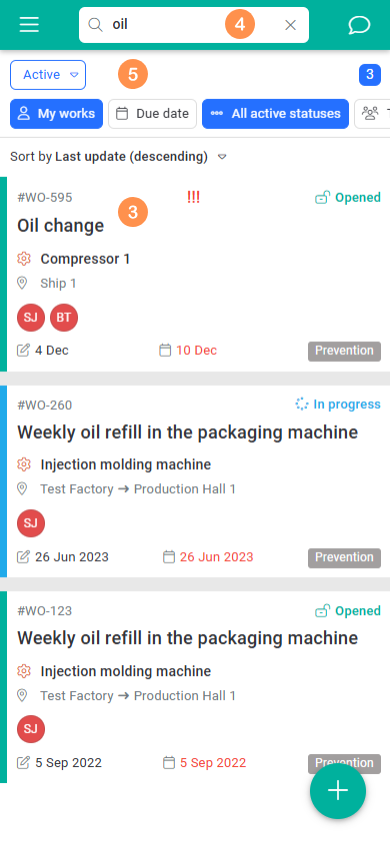
- Indicate the work order you will be carrying out
ⓘ Tip
Use the phrase search function(phrases from the title and description of the Work Order are searched for) and/or filtersFilters can be moved left/right.
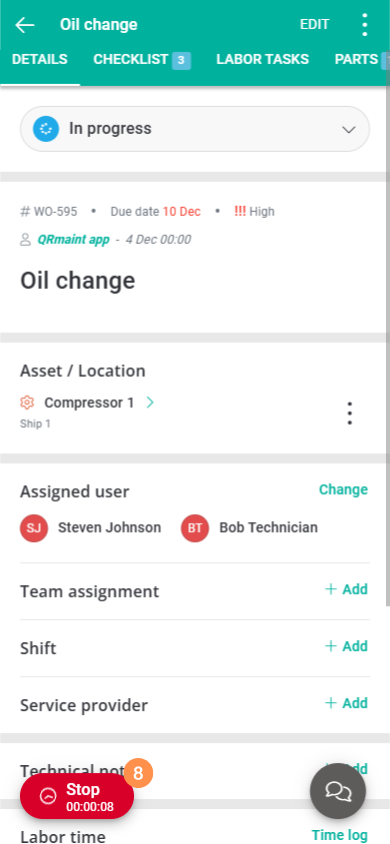
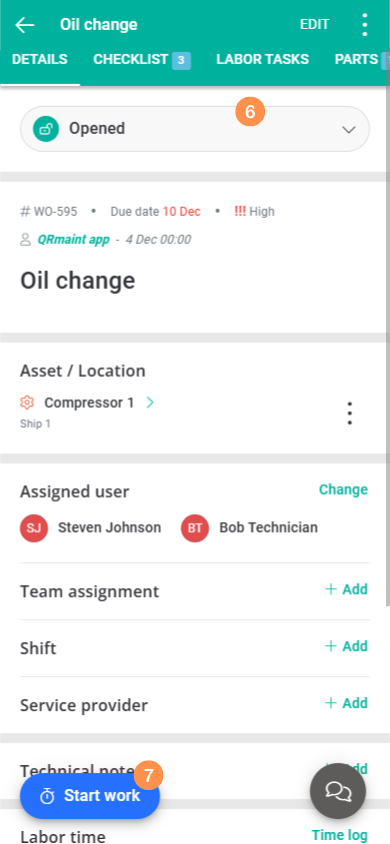
- In the work order card we can see the Work Order status, the Work Order is Opened
Work Order status information . - Click Start work
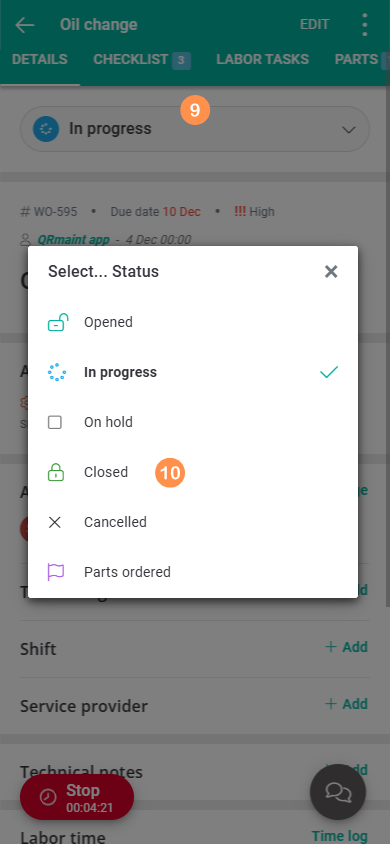
- A stopwatch will start to measure the time it takes to complete the Work Order. You can stop the stopwatch, for example, if you need to take a break or take on other work. In such a case, click Stop

After stopping the stopwatch, you can resume work on the Work Order. In this case, click Start . The Work Order time measurement will resume. - In the Work Order form tabs you can enter additional information ( description of work orders form tabs ).
- Once you have entered all the information, expand the Work Order status listand select Closed
- Describe your actions in the Technical Notes window , such as the steps you took to resolve the issue, and click Save .
Adding parts to a work order step by step #
Adding a part to a work order means taking it from the warehouse.
By default, the warehouse status is updated automatically after adding or removing parts used to complete the work order. In the system settings Settings -> System -> Spare parts management you can enable the part reservation option (Automatically update warehouse status). Uncheck the option to enable the part reservation mode and have full control over its warehouse status. The part will not be picked or returned to the warehouse without confirmation of the above action by the person operating the warehouse.
The procedure for adding a part to a work order with the part reservation function enabled or disabled is the same. The difference only appears at the last stage, where we have to click Download or Reserve .
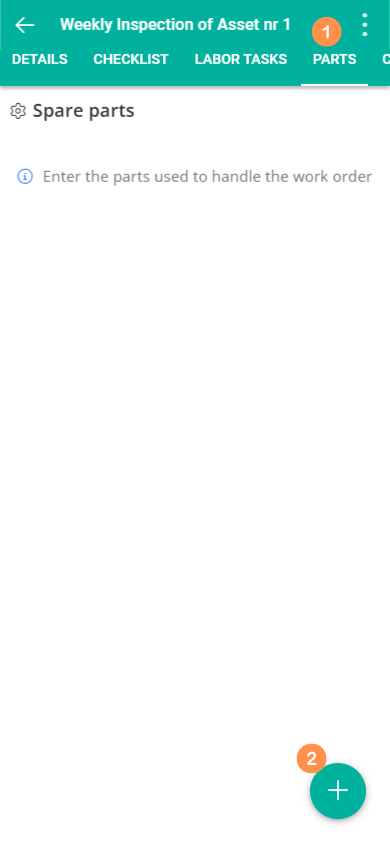
- In the work order form, go to the PARTS tab
- Click +

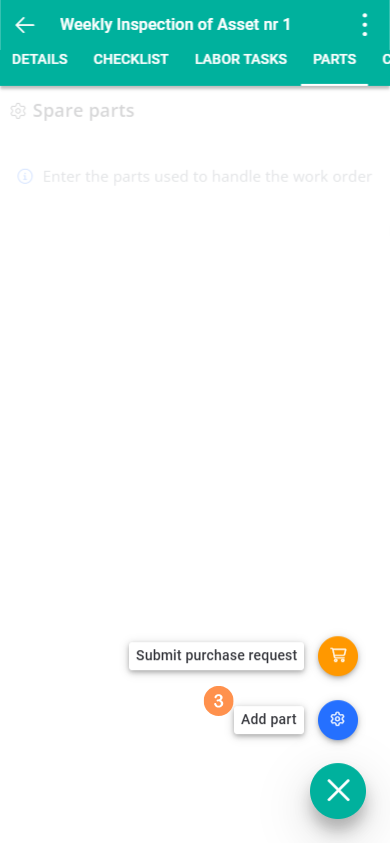
- Click Add part

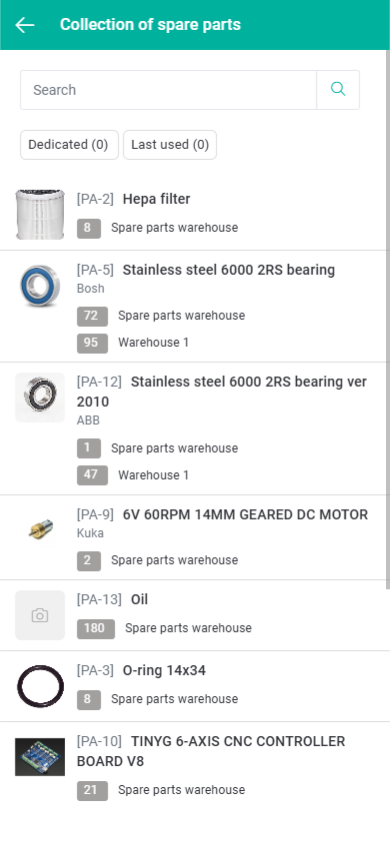
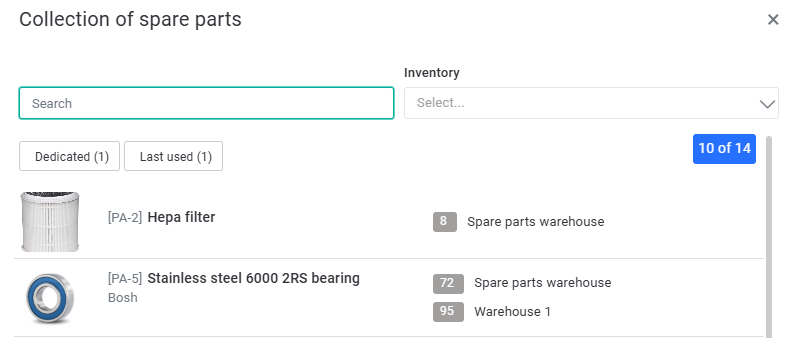
- Indicate the part you want to add and use during the work order. You can use the search and filter by warehouse, dedicated or recently used.

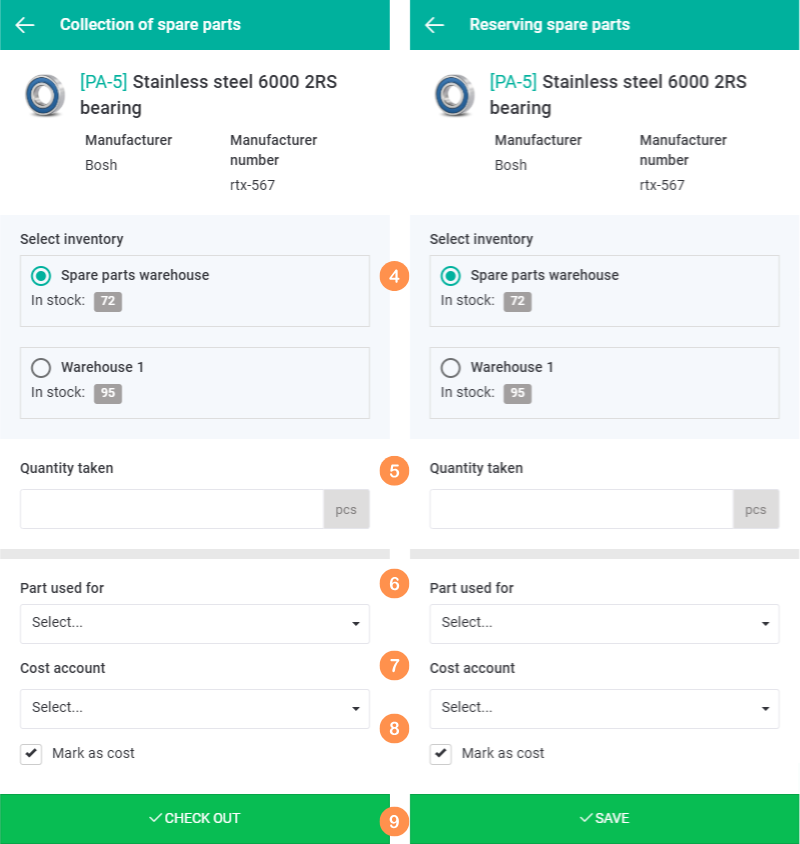
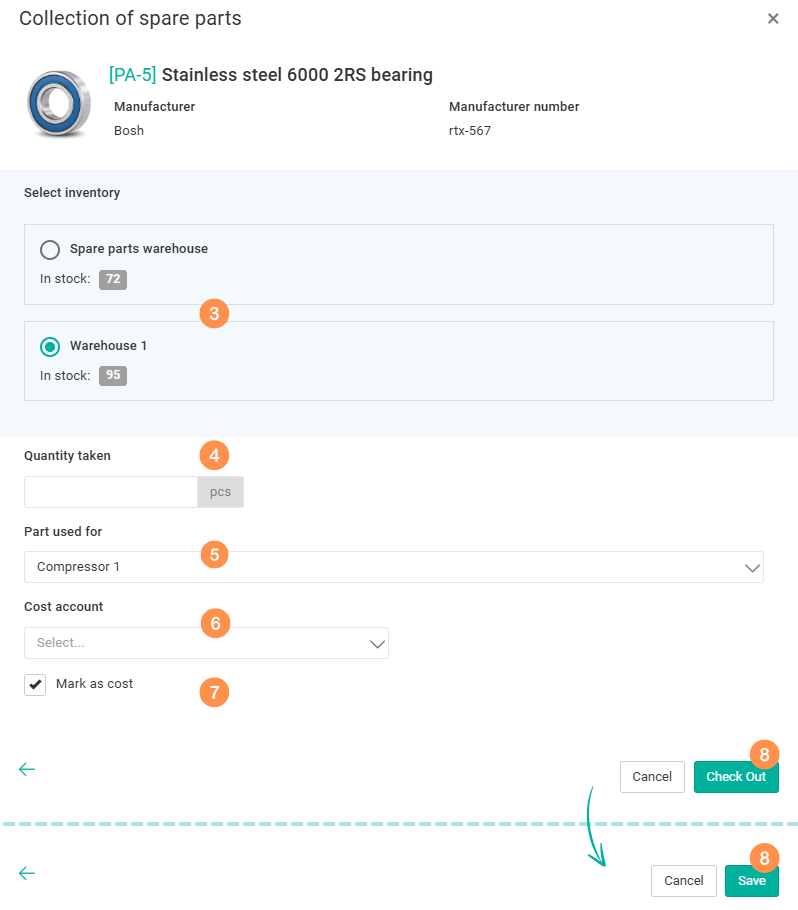
- If you choose a part that is available in several warehouses, select the warehouse from which you want to download the part
- Enter the number of parts to be downloaded
- If the work order concerns several devices, select the device for which the part will be used from the drop-down list
- From the drop-down list, select the MPK cost account that will be charged with the cost of the collected part
- Check the Mark as cost box if you want the download to be a cost
- Click Chack out or Save
Step-by-step execution of a work order in the desktop application installed on a PC #
- In your web browser, enter the address https://app.qrmaint.com
- Log in to your QRmaint user account.
- In the main menu, select Work Orders
- In the available work order list, click on the work order that will be carried out
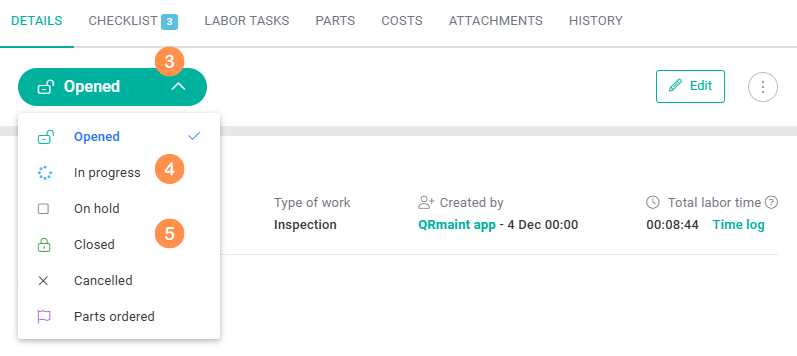
- In the work order card we can see the work order status Open , click the green button
- From the expanded list we can change the statuses (work order status description ), select In progress

The technician’s time counters for the work order will be started. In the work order form tabs you can enter additional information ( description of work order form tabs ). - Once you have entered all the information, expand the work order status listand select Closed
Adding parts to a work order step by step #
Adding a part to a work order means taking it from the warehouse.
By default, the warehouse status is updated automatically after adding or removing parts used to complete the work order. In the system settings Settings -> System -> Warehouse you can enable the part reservation option (Automatically update warehouse status). Uncheck the option to enable the part reservation mode and have full control over its warehouse status. The part will not be picked or returned to the warehouse without confirmation of the above action by the person operating the warehouse.
The procedure for adding a part to a work order with the part reservation function enabled or disabled is the same. The difference only appears at the last stage, where we have to click Download or Reserve .
- In the work order form, go to the PARTS tab
- Click Add Part

- Indicate the part you want to add and use during the work order. You can use the search and filter by warehouse, dedicated or recently used.

- If you choose a part that is available in several warehouses, select the warehouse from which you want to download the part
- Enter the number of parts to be downloaded
- If the work order concerns several devices, select the device for which the part will be used from the drop-down list
- From the drop-down list, select the MPK cost account that will be charged with the cost of the collected part
- Check the Mark as cost box if you want the download to be a cost
- Click Check out or Save (reserve option)
Description of work order statuses #
| Field name | Description of gender |
|---|---|
| Open | Repeating information about the current status (the marker is visible on the right). An open work order is an active work order that has not yet been completed. |
| In progress | Work on the task is in progress. The person performing activities related to the task should select the “In Progress” status. |
| On hold | Work on the Work Orderis suspended. Select this when you are interrupting work, for example due to a lack of parts or the need to perform other work with a higher priority. |
| Closed | The work has been completed. We select the status after completing the work and filling out the Work Order card. |
| Cancelled | We select the status if we want to cancel the Work Order. After selecting the cancellation status, the system will force us to enter the reason. |
Description of the Work Order form tabs #
| Field name | Description of gender |
|---|---|
| CHECKLIST | You can add points for verification. |
| LABOR TASKS | You can add Work Orders that need to be done during the Work Order. You can assign people to the Work Orders. |
| PARTS | You can add used spare parts to the Work Orderor generate a demand. Added parts will be automatically pulled from the warehouse or will be reserved and the collection will require confirmation from the warehouse coordinator (according to the settings in Settings -> System -> Warehouse ). A demand can be added for spare parts (e.g. those that I do not have in stock), services or other. The added demand will require acceptance by the work coordinator. |
| COSTS | You can add additional costs incurred while handling the Work Order, e.g. travel, utilities used, or damaged product incurred during repair. |
| ATTACHMENTS | You can add various types of attachments such as photos, video files, backups, notes, protocols, etc. |
| HISTORY | The entire history of the Work Order is visible, such as technicians’ work times and status changes. |
