Welcome to the group of users of the QRmaint CMMS system. We are happy to be involved in improving the efficiency, reliability and reducing the maintenance costs of your machinery.
In this section, we will guide you through the configuration of the QRmaint system account. Correctly performing the following settings will provide many benefits from implementing a modern CMMS system.
Let’s take a few steps together to fully use the QRmaint system, enjoy intuitive operation and implement processes that will improve the Key Performance Indicators ( KPIs ) of your department/area/plant/company.
1. Step One: Basic Settings #
Basic settings are the configuration of the QRmaint system, which should be performed at the very beginning of use. It will be possible to change the configuration at a later stage, but it is important to configure the system at the beginning, according to the principle: if you do something, do it right the first time.
Basic settings are described in the article:
System – basic settings
Set the branding section if you want your organization’s logo to appear on the login page, in messages sent by the system and in reports.
Enable technician labor cost records and set the average hourly rate for your team. This will allow you to monitor the actual costs of work order execution, which will ultimately allow you to know the real operating costs of the entire UR department. Remember that the costs of work order execution are the costs of spare parts used in the work order, additional costs entered manually (the cost of additional invoices, eg service arrival, UDT inspection) and the cost of technicians working on the work order.
Set the plant work schedule if you want the QRmaint system to calculate key KPIs, such as: MTBF, MTTR, availability and unavailability (failure rate).
2. Step Two: Add Production Locations/Area #
Location is a physical representation of the structure of the supervised machine park, production-related systems or real estate. We configure locations as an expandable tree structure. Using the location tree, at a later stage you will grant permissions to specific locations to QRmaint system users.
In the locations module you can also add production areas. A production area is also a location. If we configure a given location as a production area, then key KPI indicators will be calculated for this area, taking into account the assets and production lines included in it.
When configuring the location structure, it is worth doing it once and for all. A reliably reflected plant structure will pay off in later stages of working with the QRmaint program.
Only in the configured location add assets, fixed assets or objects that you will supervise.
Adding a location is described in the article:
Adding a new location
3. Step Three: Add Assets #
For the QRmaint system, a asset is an object performing a specific work order (e.g. a technological process), assigned to a specific location. A good definition of a device is the English word asset , which means fixed asset .
A production line is also an asset , which may or may not include other assets.
Assets and production lines are final elements subject to the supervision of technical services.
Start adding assets or production lines only after setting up the location. Assets can be edited and added at a later stage, but remember that the more precisely we do it at the very beginning, the easier it will be to use the system later.
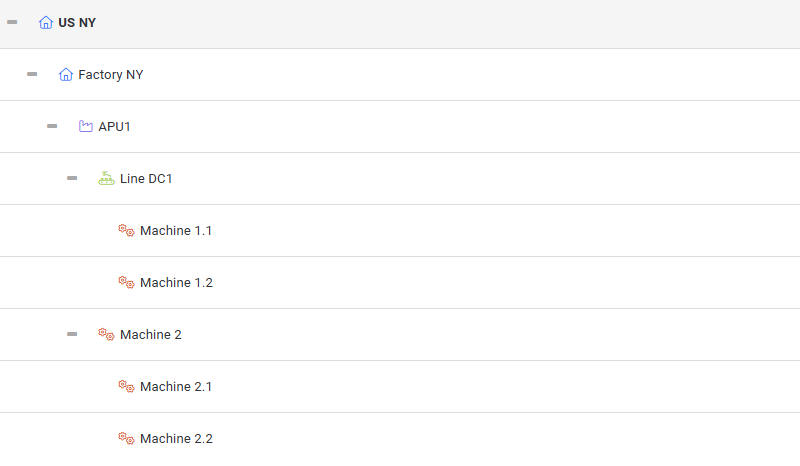
Below is an example of a tree view showing the location, production area, production line and assets:

Adding assets is described in the article:
Adding a new asset
Cloning a asset
Importing assets
At any stage of using the QRmaint system you can convert:
asset <-> production line <-> production area <-> location
4. Step Four: Set the Appearance of Forms #
In the form settings we have the option of configuring, i.e. selecting the information that will be included in the work order, notification, spare parts, supplier forms, etc. It is worth doing this so that only the fields that we want to be filled in are visible. Too many are discouraging, too little may prevent us from collecting some data.
The form appearance settings are described in the article:
Form settings
5. Step Five: Create Collaborator Accounts #
All information about the types of user accounts, adding new users and assigning permissions is described in the articles below.
Basic information
Adding a new user
Managing permissions
Managing notifications
6. Step Six: Install the QRmaint App #
Work in the CMMS QRmaint system is possible in both the mobile and desktop applications. Only the mobile application will guarantee that data on current failures, inventory levels or personnel resources will be updated on an ongoing basis, which is why we recommend installing the QRmaint application on mobile devices . It is worth mentioning that the functionality of the mobile application is identical to the desktop.
The procedure for installing the QRmaint application on mobile devices is presented in the article:
Installing the QRmaint application
