| Platform | ✅ Web ✅ Mobile |
|---|---|
| Plan | ✅ Standard ✅ Professional ✅ Premium |
| User Type | ✅ Administrator ❌ Technician ❌ Limited Technician ❌ Requester ❌ Extended Requester |
ⓘ Note
Start adding assets or production lines only after setting up the location. Assetscan be edited and added at a later stage, but remember that the more precisely we do it at the very beginning, the easier it will be to use the system later.
Start adding assets or production lines only after setting up the location. Assetscan be edited and added at a later stage, but remember that the more precisely we do it at the very beginning, the easier it will be to use the system later.
ⓘ Tip
In the assets module it is also possible to add and edit locations.
In the assets module it is also possible to add and edit locations.
Adding a new assets step by step #
-
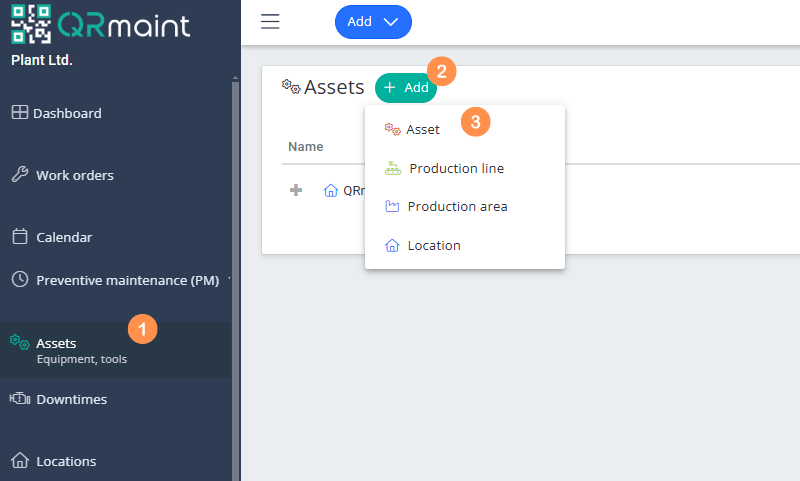
- Log in to your QRmaint system administrator account.
- In the main menu, select Assets
- Select + Add
- From the expanded list (assets /production line/location) select Asset

- Fill out the Add New Asset form and click Save

List of fields in the Add new assets form #
| Field name | Description of gender |
|---|---|
| Required field Name |
The machine name is the name you will refer to when calling the machine, e.g. for reports, preventive work orders or parts collection from the warehouse. The name will be visible in both the tree and list view. |
| Required field Located at/Part of |
Indicate the location to which the asset is assigned. After clicking the Select field, indicate the location by expanding the location tree list.
ⓘ Tip
If you don’t find the desired location in the drop-down list, you can add it here by clicking the (+) button. You can find how to add a new location here . |
| Add Picture/File | Add a photo of the asset, workstation, and/or nameplate.
ⓘ Tip
The Attachments tab is the place to attach machine documentation. In this tab, you can add various types of files, such as certificates, calibration protocols and machine documentation (machine documentation should be marked as documentation, which will cause the inserted file to always be at the top of the list. The Attachments tab will appear after saving the Add new asset form . |
| Manufacturer | Select the name of your asset manufacturer from the drop-down list.
ⓘ Tip
If you cannot find the machine manufacturer in the drop-down list, you can add it here by clicking the (+) button. |
| Model | Enter your asset model. |
| Serial number | Enter your asset’s serial number. |
| Type of asset | Select your asstetype from the drop-down list.
ⓘ Tip
For better management of the machine park, you can group asset, which will be helpful when analyzing data and generating reports. If you do not find the type of asset in the drop-down list, you can add it here by clicking the (+) button. |
| Allow public request | Checkbox. Select to allow anonymous people to report bugs without a QRmaint account. |
| Criticality | If you are analyzing the criticality of an asset, you can select the appropriate criticality level from the dropdown list. |
| Cost account | From the drop-down list, select the name of the MPK account (cost center). If you link assets to the MPK account, the downloaded parts will automatically charge the indicated account.
ⓘ Tip
If you cannot find the correct MPK account in the drop-down list, you can add it here by clicking the (+) button. |
| Contact person | Enter the contact person from the machine manufacturer’s website. |
| Asset maintainer | By clicking the +Assign person button , you can designate people to be notified in the mobile application about a new notification and the current status of work orders for this assets. |
| Service Provider | From the drop-down list, select the service provider that services the assets. The service provider will be notified about work orders , planned work, and work order status changes.
ⓘ Tip
If you cannot find the correct supplier/contractor in the drop-down list, you can add it here by clicking the (+) button. |
| Production date | Enter the production date of your asset. |
| Installation date | Enter the date your asset was installed. |
| Warranty expiration date | Enter the warranty end date. |
| Purchase price | Enter the starting price of the asset you are introducing. |
| Additional info | Enter additional information about your asset. |
| External ID | The external service ID is used for communication with other systems, e.g. MES, direct communication with the PLC or HMI asset controller via API. |
| Check-in and Check-out tracking | Options box. Enable asset download logging to have information about who is currently using it and whether it has been returned. Just scan the QR code or select from the list in the mobile app. |
| Autonomous device | An autonomous device is one whose failure does not affect the parent devices. |
| Save |


